- 35 minutes
- A valid STS Configuration
- Linux terminal to run openssl commands
Introduction
In the last post, we had an introduction to the newly released Nectar API and got a demonstration walk through on how one can use to generate valid STSEd2 (STS-6) tokens. This post demonstrated how to do this by filling out the actual STS configuration form in the Configurations section of the Nectar API portal. While using this form from a private computer to add in the elements of an STS configuration is likely secure, on public or shared devices, key loggers or other nefarious programs maliciously installed in the device can capture keystrokes and elements of your STS configuration before the Nectar API client portal encrypts and send the configuration to the cloud.

In this second series of articles on the Nectar API, we will look at the more secure and recommended approach to using the Nectar API to upload STS configurations and use them to generate tokens. A number of these steps will be similar to those used in the earlier post.
Step 1: Create an account
To begin using the Nectar API, first create an account at https://portal.nectar.software/register. You will receive an email to the registered email address for you to confirm registration.

Step 2: Login to Nectar API
Using the created credentials, log into Nectar API and create a new set of credentials at https://portal.nectar.software/credentials. The new set of credentials must contain at minimum the Generate Token Permission. Once the credential is generated, it will have a ref, key and secret. The key and secret will be necessary to make further calls to the Nectar API.

Step 3: Create an STS configuration
Your STS prepaid meter manufacturer or Key Management Center (KMC) manager may provide you with an STS configuration. Or you may provide the manufacturer with an STS configuration and they may provide you with Key Change Tokens (KCTs) to convert their meters to your configuration. Either way, at this point you will require a complete STS configuration for your meter(s) to proceed.
The STS configuration must be composed of the following elements
- Key Expiry No (KEN)
- Encryption Algorithm (EA)
- Decoder Key Generation Algorithm (DKGA)
- Tariff Index (TI)
- Key Revision No
- Vending Key (VK)
- Supply Group Code (SGC)
- Key Type (KT)
- Base Date (BD)
- Issuer Identification No (IIN)
Please ensure that you have all these required STS configuration elements before proceeding to the next step.
Once obtained, format these configurations into a YAML like document and save it securely on your device with the extension .txt. The following is an example of a valid STS configuration that can be uploaded to the Nectar API portal.
---
name: example_config
key_expiry_no: 255
encryption_algorithm: sta
token_carrier_type: numeric
decoder_key_generation_algorithm: 04
tariff_index: 01
key_revision_no: 1
vending_key: 0123456789abcdef
supply_group_code: 123456
key_type: 3
base_date: 2035
issuer_identification_no: 600727
Please take note of the following when creating this STS configuration.
- The
namebe any desired STS config name. The Nectar API does not require this it to be unique. - The
key_expiry_numbercan be any integer between 0-255. - The
encryption_algorithmmust be one of the following valuessta,deaormisty. - The
token_carrier_typemust always be set tonumeric. - The
decoder_key_generation_algorithmmust be one of the following values01,02,03or04. - The
tariff_indexmust be a 2 digit number. - The
key_revision_nomust be a number between 1 and 9. - The
vending_keymust be a 16 character hexadecimal string. This must be entered in big endian. - The
supply_group_codemust be a 6 digit number. - The
key_typemust be a number between 0 and 3. - The
base_datemust be one of the following values1993,2014or2035. - The
issuer_identification_nocan either be600727or0000.
If any of these configurations is unclear or not provided, please review the technical specification IEC 62055-41:2018 or reach out to your STS prepaid meter or KMC manager to provide these details.
Step 4: Create an AES symmetric Key and Initialization Vector
A 128 bit AES key and initialization vector (IV) will be required to encrypt your STS configuration. Please use the following command to generate the symmetric key and IV.
echo -n -e 1234567812345678 > iv.txt
echo -n -e "v8y/B?E(H+MbQeTh" > sym.txt
Step 5: Encrypt your STS configuration
You can now use the following commands to encrypt your STS configuration and convert it to base64.
# Convert the sym and IV to hex
xxd -p -l 16 <<< cat iv.txt # outputs 31323334353637383132333435363738
xxd -p -l 16 <<< cat sym.txt # outputs 7638792f423f4528482b4d6251655468

# Encrypt your STS config using the IV and symmetric key
openssl enc -aes-128-cbc -in sts_config.yml -out encrypted_sts_config_no_iv.bin -K  7638792f423f4528482b4d6251655468 -iv 31323334353637383132333435363738

# Concatentate the IV and encrypted STS config output
cp iv.txt encrypted_sts_config_with_iv.bin
cat encrypted_sts_config_no_iv.bin >> encrypted_sts_config_with_iv.bin

# base64 the resultant encrypted IV and STS config
cat encrypted_sts_config_with_iv.bin | base64 > encrypted_sts_config_with_iv_base64.txt
Step 6: Generate an encrypted STS config digest
A message digest of the STS config has to be generated using SHA-256. The hashed message digest then has to be encrypted with your private key. This private key’s, public key pair must already have been uploaded into the Nectar portal. Public keys can be managed using the Public Keys page. The PKI key pair are 4096 bit RSA Keys. The output of the SHA-256 must then be base64 encoded.
The following commands can be used to generate aSHA-256 hash of the STS configuration file and encrypt the configuration file using an RSA private key.
# Generate RSA private key
openssl genrsa -out key.pem 4096

# Extract the public key
openssl rsa -in key.pem -pubout > public.pub

# Generate SHA256 digest and sign encrypting it with your private key
cat sts_config.yml | openssl dgst -binary -sha256 | openssl rsautl -sign -inkey key.pem -in - -out - | openssl base64 > encrypted_digest.txt
The public key generated in this step must be uploaded to http://portal.nectar.co.ke/public-keys before next steps. Please note that your need just one set of public-private keys to use the Nectar API. Therefore, when uploading multiple STS configurations, just one PKI pair is required. You can however create multiple, if desired, or if a specific PKI pair is compromised.
Step 7: Encrypt your STS configuration
Any 128 bit AES Key symmetric key can be used to encrypt an STS configuration. An example is v8y/B?E(H+MbQeTh. This symmetric key must be encrypted using Nectar’s Public Key available here.
The following commands can be used to encrypt the symmetric key using Nectar’s public key.
# Encrypt symmetric key using Nectar public key
openssl rsautl -encrypt -pubin -inkey nectar_public.pub -in sym.txt -out encrypted_symmetric.bin

# Convert to base64 encoding
base64 encrypted_symmetric.bin > encrypted_symmetric.txt
Step 8: Upload your STS configuration to the Nectar API portal
At this point, you should have 3 files:
- An encrypted STS configuration
- A signed STS configuration digest
- An encrypted symmetric key
Please review the previous steps to ensure that you have these 3 files before proceeding to next steps. You can now navigate to the configurations page at https://portal.nectar.software/configurations and select the first tab titled Option 1: Upload STS Configuration (Recommended). Upload these three files to the various sections in this form and save. The encrypted files are uploaded to the Nectar API portal and decrypted using your public key and Nectar’s private key and stored in a virtual cloud HSM.
Step 10: Generate Tokens
With a successfully uploaded STS configuration, you are now ready to begin generating prepaid STS tokens using the Nectar API.
There are a number of options to generate tokens using the Nectar API. These are
- Use a Java/PHP Nectar API SDK. You can view all Nectar API SDKs at Java, Python, PHP
- Make REST requests to the Nectar API at https://api.portal.nectar.software. Refer to the documentation at https://portal.nectar.software/docs for more details.
- Through the Nectar API portal itself using the Simulators page at https://portal.nectar.software/simulators and selecting the Token Generator option.
While option 3 above is the fastest, for purposes of this guide, we will use a Nectar API SDK (Option 1) to show how requests to the Nectar API can be integrated into any existing code base. We will use Java.
First modify your build.gradle file to include the Nectar API SDK
implementation group: 'software.nectar.java', name: 'nectar-java-sdk', version: '0.9.2-alpha
Below is an example of token generation code using the Nectar API Java SDK
import software.nectar.java.models.*;
import java.time.Instant;

public class NectarTest {

    // These can be obtained from your credentials page
    // https://portal.nectar.software/credentials
    private final String KEY = "a0...38453";
    private final String SECRET = "cf....fd7a";

    private Nectar nectar = new Nectar(KEY, SECRET);

    public static void main(String[] args) {
        try {
            Instant generationTime = Instant.parse("2018-05-16T07:29:00.00Z");
            int wmFactor = 10, randomNo = 5;
            boolean isStid = false, debug = false;
            String drn = "47500150231", configRef = "cbf4...c846c"; // config ref is an STS config as uploaded on https://portal.nectar.software/configurations

            Token generatedToken = nectar.getTokenFactory()
                    .generateSetWaterMeterFactorToken(generationTime, wmFactor, randomNo, isStid, drn, configRef, debug);
        System.out.println(String.format("Generate Token\n====================\n%s\n", generatedToken));

    }
}
This generates the following output
4:04:34 PM: Executing task 'NectarTest.main()'...

> Task :compileJava
> Task :processResources NO-SOURCE
> Task :classes

> Task :NectarTest.main()
Response Code : 200
Generate Token
====================
Token { ref: 8e886a29-3766-40a9-9bae-1543e465e355, token_no: 24260829498939505863, user_ref: 49bc59e5-b261-423d-9600-fd479a31aca5,token_type: SetWaterMeterFactor_27, meter_no: 47500150231, created_at: 2021-07-22T13:04:38.386491Z }
Please note that to generate tokens, you will need to procure credits using the ‘Buy’ button on the left of the Nectar API portal. However, if your payment mode is unsupported (or you would like a few test credits :)), please reach out with your request to info@nectar.software.
That’s all folks!
]]>Please use this link to access the more recommended way to use the Nectar API to generate tokens for production systems https://nectar.software/blog/?p=93
Nectar API is a cloud-based, REST API that allows utilities and service providers to generate STS (IEC 62055-41:2018) tokens. This guide is aimed at developers who wish to use the Nectar API to generate tokens for the prepaid electricity, water and gas meters or want to gain a deeper understanding of the STS standard and how it is used for prepayment.
Prequisities
- 35 minutes
- A valid STS Configuration
- git to clone the Nectar API SDKs
- Postman, Insomnia, curl enabled terminal to run basic commands
Step 1: Create an account
To begin using the Nectar API, first create an account at https://portal.nectar.software/register. You will receive an email to the registered email address for you to confirm registration.
Step 2: Login to Nectar API
Using the created credentials, log into Nectar API and create a new set of credentials at https://portal.nectar.software/credentials. The new set of credentials must contain at minimum the Generate Token Permission. Once the credential is generated, it will have a ref, key and secret. The key and secret will be necessary to make further calls to the Nectar API.
Step 3: Create an STS configuration
To generate STS tokens, you will first need to create a 128 bit AES symmetric key and your 4096 bit RSA keys PKI private-public key pair. To generate the 128 bit AES symmetric key, simply generate a random 16 character string and store it in a txt file with any desired name. The following is an example of a valid symmetric key, saved as symmetric_key.txt.
sve5GXjhk[~&J/-wPlease note that this key must be kept confidential.
To generate a PKI key pair, you may use websites such as https://www.devglan.com/online-tools/rsa-encryption-decryption or use the following commands
openssl genrsa -out private_key.pem 4096
openssl rsa -in private_key.pem -pubout > public_key.pub
This command will generate a public private key pair and store it in the desired location.
Step 4: Upload the generated public key
For the Nectar API to decrypt submitted STS configurations, you will need to upload the generated public key in your PKI key pair at https://portal.nectar.software/public-keys. Give your public key any desired descriptive name. Kindly note that Nectar API does not enforce uniqueness of the Public Key name.
To copy the public key, use the following command
xclip -sel clip < id_rsa.pub
Be sure to select the activated checkbox and trim the public key to remove the -----BEGIN PUBLIC KEY----- and -----END PUBLIC KEY----- sections of the public key. The Nectar API will validate the public key.
Step 4: Procure Credits
Credits will need to be procured to generate tokens via the Nectar API endpoints (https://api.nectar.software) or via any of the Nectar API SDKs. To procure credits, simply select the Buy button on the left of the Nectar API portal.

Credits can be procured using MPESA. Other forms of payments are still being added to the platform. To reload using other payment modes, please write to info@nectar.software for more details.
Step 5: Generate an STS configuration
An STS configuration must be generated and its ref referenced in your API calls. Therefore, at least 1 STS configuration must be created for every account in the Nectar API. To generate an STS configuration, navigate to the configurations page at https://portal.nectar.software/configurations.
There are multiple ways to create and securely manage STS configurations using the Nectar API. These include via the use of the Nectar API portal, SDKs or via the Nectar API REST endpoints at https://api.nectar.software. Using all these channels, STS configurations are encrypted on the client before being transmitted to the Nectar API virtual HSM.
For the purposes of this guide, we will use Option 2: Fill in the STS configurations tab to fill in the STS configuration. The following are the STS configuration details required
- Key Expiry No (KEN)
- Encryption Algorithm (EA)
- Token Carrier Type (TCT)
- Decoder Key Type Generation Algorithm (DKGA)
- Tariff Index (TI)
- Key Revision No (KRN)
- Vending Key (VK)
- Supply Group Code (SGC)
- Key Type (KT)
- Base Date (BD)
- Issuer Identification No (IIN)
The Nectar API documentation at https://portal.nectar.software/docs shows the format required for each of these parameters. Any name can be provided for the configuration. The symmetric key generated in step 3 will be used here. Kindly note that your private key used here will not be transmitted to the Nectar API server but is only used to locally encrypt the payload. In addition, the text -----BEGIN PRIVATE KEY----- and -----END PRIVATE KEY----- must be removed from the private key for this step. To view the specific encryption steps of the STS configuration before submission to the Nectar API server, please review the Nectar API documentation.

Once the STS configuration is encrypted and transmitted to the cloud HSM, you are now ready to begin generating tokens.
Step 6: Generate Tokens
There are a number of ways to generate tokens using the Nectar API. These are
- Use a Nectar API SDK available here
- Make REST requests to the Nectar API at https://api.portal.nectar.software. Refer to the documentation at https://portal.nectar.software/docs for more details.
- Through the Nectar API portal itself using the Simulators page at https://portal.nectar.software/simulators and selecting the Token Generator option.
While option 3 above is the fastest, for purposes of this guide, we will use a Nectar API SDK (Option 1) to show how requests to the Nectar API can be integrated into any existing code base.
Below is an example of token generation code using the Nectar API Java SDK
public class NectarTest {

    private final String KEY = "a0...38453";
    private final String SECRET = "cf....fd7a";

    private Nectar nectar = new Nectar(KEY, SECRET);

    public static void main(String[] args) {
        try {
            NectarTest test = new NectarTest();
            Map<String, Object> params = new HashMap<>();
            params.put("class", "2");
            params.put("subclass", "7");
            params.put("token_id", "2018-05-16T07:29");
            params.put("wm_factor", "10");
            params.put("random_no", "9");
            params.put("is_stid", "false");
            params.put("drn", "47500150231");
            params.put("config_ref", "9f4e2....f620");
            params.put("debug", "false");

           Token generatedToken = nectar.getTokenFactory()
                .generateToken(params);
           System.out.println(String.format("Generate Token\n====================\n%s\n", generatedToken));
    }
}
This generates the following output
4:04:34 PM: Executing task 'NectarTest.main()'...

> Task :compileJava
> Task :processResources NO-SOURCE
> Task :classes

> Task :NectarTest.main()
Response Code : 200
Generate Token
====================
Token { ref: 8e886a29-3766-40a9-9bae-1543e465e355, token_no: 24260829498939505863, user_ref: 49bc59e5-b261-423d-9600-fd479a31aca5,token_type: SetWaterMeterFactor_27, meter_no: 47500150231, created_at: 2021-07-22T13:04:38.386491Z }
Important to note is that
- The KEY and SECRET used in the example Java refer to the KEY and SECRET assigned to the credentials.
- When putting together the params HashMap, the config_ref refers to an STS configuration ref.
That’s all folks!
If you have not reviewed the previous blog post, please review it here first.
Introduction
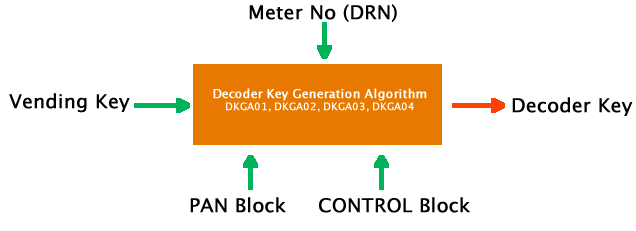
While a service provider will usually only have a single vending key at a time, unique decoder keys have to be generated from this vending key for each service provider’s STS certified prepaid meter. These decoder keys are usually generated by the manufacturer and encoded into the meter before delivery to a service provider. In addition, a token generation system uses a vending key and meter no (Decoder Register Number – DRN) to generate decoder keys for every token generation request before passing along this decoder key to the next step of the token generation process.
The IEC 62055-41:2014 standard contains 3 decoder key generation algorithms; DKGA01, DKGA02 and DKGA03. IEC 62055-41:2018 however deprecated DKGA03 in favor of a new decoder key generation algorithm DKGA04. Therefore token generation systems and prepaid meters currently require to support DKGA02 or DKGA03 to achieve STS compliance certification from the STS Foundation. DKGA01 is legacy.
| Code | DKG Algorithm | Encryption Method |
| 01 | DKGA01 | Limited to early legacy STS compliant meters |
| 02 | DKGA02 | Uses 64 bit DES Vending Key Derivation |
| 03 | DKGA03 | Uses dual 64 bit Vending Key Derivation |
| 04 | DKGA04 | Uses KDF-HMAC-SHA-256 Vending key Derivation |
Let’s review each of these decoder key generation algorithms.
DKGA01
DKGA01 was one of the earliest DKGAs used in the STS standard before it was superseded by DKGA02. In fact, it is only maintained in the standard for backward compatibility with early prepaid meters and should not be used for token generation unless your meters meet ALL of the following specific conditions:
- Your meters use an Issuer Identification No (IIN) of 600727. The Issuer Identification No is a number assigned (usually by the STS Foundation by a Service Provider) for accounting purposes to identify transactions. It is concatenated with a meter no (DRN) to generate a token as we will see below. Where the DRN is 11 digits (the majority of cases), then the IIN will be a 6 digit number. Right now, even the newest meters and token generation systems still use 600727 by default as the IIN. Where the meter no (DRN) is 13 digits, then the IIN must be 0000. In practice, the IIN is not used for identification of transactions but merely as 600727 as a relic of the standard.
- Your meters use a Key Revision No (KRN) of 1. The KRN is an artifact of the STS standard and specifies which version of the vending key a service provider is using to generate tokens. It can range from 1-9 meaning the STS standard in theory supports just 9 versions of vending keys per service provider.
- Your meters use a Key Type (KT) of 1 or 2. A KT is basically a number that identifies the type of vending or decoder key used. As we mentioned in the previous post, there are 4 types of vending keys and 3 types of vending keys. These are all assigned the respective KT number as shown below.
| KT | SGC Type | Vending Key Type | Decoder Key Type |
| 0 | Initialization | n/a | DITK |
| 1 | Default | VDDK | DDTK |
| 2 | Unique | VUDK | DUTK |
| 3 | Common | VCDK | DCTK |
- Where the encryption algorithm (EA) standard used is EA07 (or in full, the Standard Transfer Algorithm (STA)). We shall be discussing encryption algorithms, which are the next process of token generation after decoder key generation, in a later set of articles in this series.
- Where the meter no (DRN) falls within the following ranges:
| 0109000000X | to | 0109000499X |
| 0100000000X | to | 0100499999X |
| 0300000000X | to | 0311400000X |
| 0400000000X | to | 0405999999X |
| 0601000000X | to | 0603999999X |
| 0640000000X | to | 0641999999X |
| 0660000000X | to | 0669999999X |
| 0699000001X | to | 0699000999X |
| 0700000000X | to | 0702099999X |
Note that X above is calculated using a simple technique using the luhn algorithm (as specified in ISO7812-1:2006).
Alternatively, to qualify to use this decoder key generation algorithm, a meter should use an IIN of 600727, a KRN of 1, a KT of 3, an EA of 7 and should have a Supply Group Code (SGC) that is one of the following values (SGC is explained in previous blog articles)
| 100702 |
| 990400 |
| 990401 |
| 990402 |
| 990403 |
| 990404 |
| 990405 |
I am not quite sure why these specific requirements are necessary for the use of the DKGA01. I suspect that this is because this was a typical installation back in the day and this configuration is a relic of that time.
So let’s see how DKGA01, actually works:
How DKGA01 actually works
As mentioned, DKGA01 uses the Data Encryption Standard (DES) to convert a vending key into a decoder key. DES is a widely popular and dated symmetric encryption standard that has now been successfully crypto-analysed. DKGA01 has the following steps:
Generating the CONTROL block
The first step in the DKGA01 process is the generation of a CONTROL block. A CONTROL block is really a combination of some parameters of a service provider’s STS configuration. Remember the STS configuration will be composed of a number of parameters all of which will be usually provided by the STS Foundation.
A CONTROL block is made of the following components:
- A Key Type (KT) digit – Denoted as C in the table below
- The Supply Group Code (SGC) – Denoted as S in the table below
- A Tariff Index (TI) Digit – Denoted as T in the table below
- A Key Revision No (KRN) digit – Denoted as R in the table below
- A Pad value which should always be 0xF hex repeated 6 times.
All these components except for the Tariff Index (TI) have been explained in this or previous blogs. A Tariff Index (TI) is a 2 digit number used to identify a tariff type. The assumption is that a service provider may have a number of tariffs and the TI is used to identify which tariff charges are used in generating a specific token. In practice however, many service providers use a TI that has no relation to the current tariff used.
Therefore a CONTROL block looks like this when generated:
| Position | 15 | 14 | 13 | 12 | 11 | 10 | 9 | 8 | 7 | 6 | 5 | 4 | 3 | 2 | 1 | 0 |
| Value | C | S | S | S | S | S | S | T | T | R | 0xF | 0xF | 0xF | 0Xf | 0xF | 0xF |
Generating the PAN Block
The next step in the Decoder Key Generation Process is generating the PAN Block. The PAN Block is a combination of 2 things:
- The IIN – Which as explained above is an identifier for transactions (Denoted as I in the table below)
- The DRN or meter no – which uniquely identifies a meter (Denoted as D in the table below)
Remember the IIN can be 4 or 6 digits (600727 or 0000) in which case the DRN will be 11 or 13 digits respectively. A valid STS configuration conforms to this requirement.
| Position | 15 | 14 | 13 | 12 | 11 | 10 | 9 | 8 | 7 | 6 | 5 | 4 | 3 | 2 | 1 | 0 |
| Value | I | I | I | I/D | I/D | D | D | D | D | D | D | D | D | D | D | D |
Combining the CONTROL Block, PAN Block and Vending Key to generate a Decoder Key
Once the CONTROL and PAN blocks are generated, they are combined with the Vending Key to generate the Decoder Key using the DES symmetric encryption algorithm. All these 3 components required are provided as part of a valid STS configuration. The vending key is a 64 bit key that has a similar structure to 0x012abcde hex

To clarify, based on the chart above, the following are the steps required to generate a decoder key from a vending key using DKGA01:
- Create the CONTROL block as described above
- Create a PAN Block as described above
- Perform an XOR operation on the CONTROL and PAN Blocks
- Encrypt the output of this XOR operation using DES (with the encryption key being the Vending Key)
- Perform an XOR operation of the output of this encryption Key with the Vending Key itself
A 64 bit decoder key will then be generated.
Let’s have a look at some example code snippet to see how this works in practice. I am using Java but feel free to transpose this to your desired programming language:
public DecoderKey generate() throws Exception {
        ControlBlock controlBlock = createControlBlock();
        PrimaryAccountNumberBlock primaryAccountNumberBlock = createPrimaryAccountNumberBlock();
        if(issuerIdentificationNumber.getValue() == "600727" &&
                keyRevisionNumber.getValue() == 1 &&
                encryptionAlgorithm.getCode() == "07") {
            if(((keyType.getValue() == 1 || keyType.getValue() == 2) && iainWithinRange(individualAccountIdentificationNumber)) ||
                    (keyType.getValue() == 3 && sgcHasValidValue(supplyGroupCode))) {
                byte[] panBlockData = Hex.decode(primaryAccountNumberBlock.getValue());
                byte[] controlBlockData = Hex.decode(controlBlock.getValue());
                byte[] panXorControlBlock = xor(panBlockData, controlBlockData);
                byte[] encryptedPanXorControlBlock = encrypt(panXorControlBlock);
                byte[] decoderKeyData = xor(encryptedPanXorControlBlock, vendingKey.getKeyData());
                return new DecoderKey(decoderKeyData);
            }
        }
        throw new InvalidDecoderKeyParametersException(Strings.INVALID_DECODER_KEY_PARAMETERS);
    }
I hope this clarifies how DKGA01 works. In the next blog post in the series, we shall look at the DKGA02 algorithm and how that functions. Please feel free to comment below or ask questions.
]]>Please review part 1 and part 2 of these blog posts if you have not done so before going on.
Why is the decoder key generation process necessary?
The decoder key generation process is used to isolate the vending key from the remainder of the STS token generation process. A vending key is a 128 bit value used by a service provider for token generation and is at the heart of the STS token generation process. Usually assigned by the STS foundation (although you can generate it on your computer), it is commonly denoted in hex (e.g. 0x0abc12def3456789 – each char is 8 bits).
This isolation process is critically important since a leaked vending key can be used to generate tokens for ANY meter belonging to a service provider using the STS configuration that uses this vending key. As you can imagine, this can lead to significant loss of revenue and vending keys are kept extremely secret.
As we mentioned in the previous blog post, the STS standard uses symmetric key encryption to generate and decode tokens. As part of the decoder key generation process, HSMs use this vending key (and among other configurations, a meter no technically called a Decoder Register Number – DRN) to generate a 128 bit decoder key unique for that meter. On Nectar however, this is done using a virtual HSM on the cloud since physical HSMs are usually band-limited to generate no more than 5,000 tokens a minute) and do not scale based on demand.
As mentioned in the previous blog post, the generated decoder key is then passed on to the second part of the token generation process that uses information such as a timestamp (Token Identifier – TID), service type (electricity, water or gas) and desired number of units to generate a 66 bit data block (or 20 digit number) that is ultimately sent to a service provider customer. This second part of the token generation process is done by the Token Generation System.
Once this 20 digit token has been sent to a customer who enters it into a prepaid meter, the meter uses a decoder key to decrypt the token contents and perform the required action required by the token. Remember STS tokens can be used to perform multiple engineering and credit functions on the meter (such as checking meter status, loading units e.t.c.). The decoder key in this prepaid meter must be the same as the one used to generate the token in the Token Generation System. And this is usually the case since the vending key is usually shared with the meter manufacturer (in a HSM) who then uses it to generate and encode decoder keys unique to each meter before they ship the meters to the service provider.
Types decoder key generation algorithms (DKGA)
- In the IEC 62055-41:2007 and IEC 62055-41:2014 standards, 3 decoder key generation standards are allowed for use DKGA01, DKGA02 and DKAG03.
- In the latest version of the STS standard, IEC 62055-41:2018, DKGA03 was deprecated and a new decoder key generation algorithm, DKGA04 introduced. This standard therefore allows DKGA01, DKGA02 and DKGA04 for use. No new STS devices will be certified if they only support DKGA03.
Most prepaid meters will only support one of these types of DKGAs. In addition, it is important to note that the STS standard allows for different kinds of decoder keys that each serve a different purpose.
- A Decoder Initialization Transfer Key (DITK) is inserted by the meter manufacturer for their own testing and verification. They are the only type of decoder key that can be stored in a meter as a plain text value and should be used for the generation of tokens. It’s Key Type (KT) value is 0.
- A Decoder Default Transfer Key (DDTK) is an encrypted key usually generated from a DITK and inserted into a meter that has not yet been assigned a Supply Group Code (SGC). An SGC is simply a 6 digit number (e.g. 123456) that defines the region or physical location that a meter will be installed in. For example, a utility or service provider may divide a country into 10 regions. Each of these regions will then be assigned a specific SGC e.g. 123450, 123451 e.t.c. and various prepayment meters will then use these SGCs when generating tokens. If the meter however has not been assigned to an SGC, it will contain a DDTK. Technically, this DDTK should not be used to generate tokens (since as we will see in subsequent blog posts, an SGC is required for token generation anyway) but some manufacturers and service providers leave the decoder type as DDTK even after SGCs have been assigned for the meter. It’s Key Type (KT) value is 1.
- A Decoder Default Transfer Key (DDTK) is an encrypted key used in meters that have a default SGC assigned. It can be generated from a DDTK. A default SGC is an SGC assigned to a meter before it is allocated to a unique SGC. Technically, a DDTK should not be used for generating or decoding tokens but this is often done in the field. It’s Key Type (KT) value is 2.
- The Decoder Unique Transfer Key (DUTK) which is an encrypted key encoded into a meter assigned to a specific (unique) Supply Group Code. It can be generated from a DDTK. It is technically ok for a token generation system to use it for token generation and for a prepaid meter to use a DUTK to decrypt tokens. It’s Key Type (KT) value is 3.
- Finally, the Decoder Common Transfer Key (DCTK) is an encrypted key similar to the DUTK. It is however only used to generate tokens for prepaid meters that accept erasable magnetic cards to store tokens. Since erasable magnetic cards are not as popular in prepaid meters anymore, DCTKs are rarely used. It’s Key Type (KT) value is 4.

Therefore, a manufacturer will usually have meters with plain text DITKs lying around before sale. Once they receive an order from a service provider and a vending key (usually from the STS foundation via a HSM), they will then use each of these meters’ DITK to generate DUTKs and encode them into the meters. DUTKs are the type of decoder key that should technically be used in token generation.
| Key Type | SGC Type | Decoder Key Type | Complete Name |
| 0 | Initialization | DITK | Decoder Initialization Transfer Key |
| 1 | Default | DDTK | Decoder Default Transfer Key |
| 2 | Unique | DUTK | Decoder Unique Transfer Key |
| 3 | Common | DCTK | Decoder Common Transfer Key |
Similar to decoder keys, there are also different types of vending keys. The vending key usually provided by the STS foundation will technically be a VUDK or VCDK (Vending Unique Derivation Key or Vending Common Derivation Keys) and these are used by the prepaid meter manufacturer to generate DUTKs and DCTKs for meters respectively.
Don’t let these types of vending and decoder keys confuse you. The important thing to note is that the STS foundation will provide you with a a vending key. This vending key will then be used to generate a decoder key specific to each meter using each meter’s meter no (DRN). The important thing to take note of is the key type of the decoder key the manufacturer used. In theory this should be key type 2 or 3 but I have seen 0 and 1 used as well.
In the next blog post, we shall begin to review each of the 4 types of decoder key generation algorithms (DKGA01, DKGA02, DKGA03 and DKGA04) and go into the specifics of how they work and look at some code. Reviewing these decoder key generation algorithms will explain exactly how a vending key is converted into its respective type of decoder key.
Stay tuned!
]]>In this blog post, we will begin the technical discussion of how the STS standard works and the various encryption algorithms used in the standard. In further blog posts, we will make detailed reviews of each of these encryption standards and review some of the code required to implement them. While there have been 3 iterations of the IEC 62055-41 prepayment standard, the general implementation of the standard has remained the same with modifications only to the encryption standards used. We’ll explain this as we go along.
The main technical components
To generate STS prepaid tokens, two main processes are involved. First, the generation of a decoder key and second, the use of this generated decoder key and an encryption process to generate a token. These two steps are discussed below.
Step 1: Decoder Key Generation
STS uses symmetric key encryption to generate and decode tokens. A token generation software platform generated an STS token for a specific meter using a decoder key and the respective prepaid meter decodes that token using a similar decoder key. In the case of the STS standard, a secret vending key is generated for each utility. This vending key is then used in combination with several components, most notably a meter no (technically known as the Decoder Register Number (DRN)) to generate these decoder key unique to each DRN. To express it more technically, a decoder key is used by STS compliant software to generate tokens (encrypt) and also inserted into the meter as a DUTK (Decoder Unique Derivation Key) and used to decode the token (decrypt).
Below is a figure showing the decoder key generation process in brief.
First, a decoder key is generated. This decoder key is generated from a Vending key (unique to every service provider), a PAN block and a CONTROL block. The most notable aspects of the PAN and CONTROL block, as mentioned above, are the Meter number (DRN). Depending on the decoder key generation used, this vending key used (and thus the decoder key generated) may be a 128 bit key or a 160 bit key.
In subsequent blog posts, we will discuss the structure of the Vending Key, CONTROL and PAN blocks and look at the various Decoder Key Generation Algorithms used to generate decoder keys from these components. STS supports 4 types of decoder key generation algorithms aptly named DKGA01, DKGA02, DKGA03 and DKGA04. It is worth noting that DKGA01 is legacy while DKGA03 based on 3DES is deprecated. Therefore only DKGA02 and DKGA04 are used with DKGA02 being a lot more popularly used.
The decoder key generation process is usually implemented in hardware security modules (HSMs) which are configured by the STS Foundation with the necessary vending key, PAN block and CONTROL block elements. Nectar however, uses a proprietary virtual HSM to store the configuration required for decoder key generation.
Step 2: The encryption process
Once a decoder key has been generated as the first part of the token generation process, an encryption algorithm is used to generate a 64 bit data block to a 20 digit prepaid token number.
STS supports 3 types of encryption algorithms; the Standard Transfer Algorithm (Encryption Algorithm 07), DEA (Encryption Algorithm 09) and MISTY1 (Encryption Algorithm 11). EA07 is the oldest and most common encryption algorithm supported in most prepaid token meters and token generation platforms. EA09 is deprecated while EA11 is the newest encryption standard that is still gaining traction since it was recently introduced in the IEC 62055-41:2018 iteration of the standard.

These encryption algorithms take the decoder key generated from step 1 and combine this with an input 64 bit data block and a number of encryption algorithms to generate a 64 bit encrypted block, which when converted to base 10 converts into a 20 digit token. The 64 bit input data block is composed of the actual desired values of the token such as the type of token (class and subclass), the time for which the token generation request has been made (also known as the token identifier (TID)), the quantity required (kWh, litres or cubic meters for electricity, water and gas respectively) and a CRC bit string.
Over the next few blog posts, we shall discuss these various encryption standards, the components of the 64 bit input block and some code used in the generation of STS certified tokens.
]]>What is prepayment?
Quite simply, prepayment in the context of the STS standard, is the payment of services like electricity, water and gas *before* use. While this might seem awkward (after all, why pay for a service before you’ve used it), prepayment is one of the largest growing markets in the world with 400 million homesteads in the world in 86 countries using the STS prepayment standard. Prepayment is similar to the purchase of mobile phone airtime before use, common in developing countries. Customers to these mobile phone operator companies then have to procure more ‘airtime’ once they have exhausted their bought minutes. Prepayment works in a similar way and allows service providers to receive payment for their services *before* usage. No need for disconnections, follow ups or meter reading.
History of the STS standard
STS stands for the Standard Specification Transfer Standard. It is an IEC standard whose first version was first published in 2007 as the IEC 62055-41:2007 specification. Since then, two more versions of the STS standard have been published namely the IEC 62055-41:2014 and the IEC 62055-41:2018 standard. This most recent version can be obtained from the IEC website here. This most recent version is also referred to as STS6 or STS Edition 2.0
The concept of pre-paid electricity vending was initiated by Eskom, a South African electricity public utility company. Prior to 1988, Eskom was chiefly concerned with supplying power to large customers such as the mines and municipalities. Payment for electricity was made through a credit based scheme and it was only after an ambitious program to electrify more than 1 million households that the use of typical credit-based payment schemes proved problematic. This was because these traditional schemes worked well where customers had bank accounts and postal infrastructure but were unsuited for the largely informal sector employment widespread at the time. Eskom thus identified the use of Prepaid Metering as a way of mitigating these issues and making the administration of electric power dispensing cost effective.
How does STS prepayment work?
STS supports prepayment for water, electricity, gas, currency and time however the most common are the first three. The first step in using STS prepayment is installing STS certified prepaid meters to replace post paid meters. The STS foundation maintains a list of all manufacturers that make STS certified meters at http://www.sts.org.za/en-us/membership.aspx.
These prepaid meters are usually configured by the manufacturer and encoded with a specific STS configuration unique to the service provider. This configuration may be provided by the STS Foundation on behalf of the service provider or it may be sent directly to the service provider from the manufacturer. The former is the more common and recommended way of sharing the STS configuration where this configuration is stored in a Key Load File (KLF) encrypted in a Hardware Security Module (HSM). This configuration must be made available to the token generation platform and this is also usually done via a HSM. More details of this process will be shared in a later blog post in this series.
Once the prepaid meters are in place, the service provider must then set up the infrastructure required to generate STS compliant tokens. This process generally involves:
1. Setting up a data center or small server room to host the servers running the token generation software and HSM(s) infrastructure
2. Obtaining the HSMs from the STS Foundation. These will have been bought by the service provider and are commonly provided by an STS Foundation partner, PRISM (https://www.prism.co.za/products/).
3. Obtaining Token Generation Software. A number of companies such as Conlog, Itron e.t.c. provide these applications
4. Based on your set up, you may require a payment gateway portal integration to allow your customers to pay for tokens and receive these tokens. Tokens are typically sent out via SMS
As you may imagine, this is usually a long, expensive and convoluted process and this is why we created Nectar, a cloud based token generation platform. With Nectar you can forgot about setting up and maintaining these aspects of tokens generation infrastructure. Instead you can just create an account on Nectar and get started with prepayment in minutes. Contact us at info@nectar.software to get started.
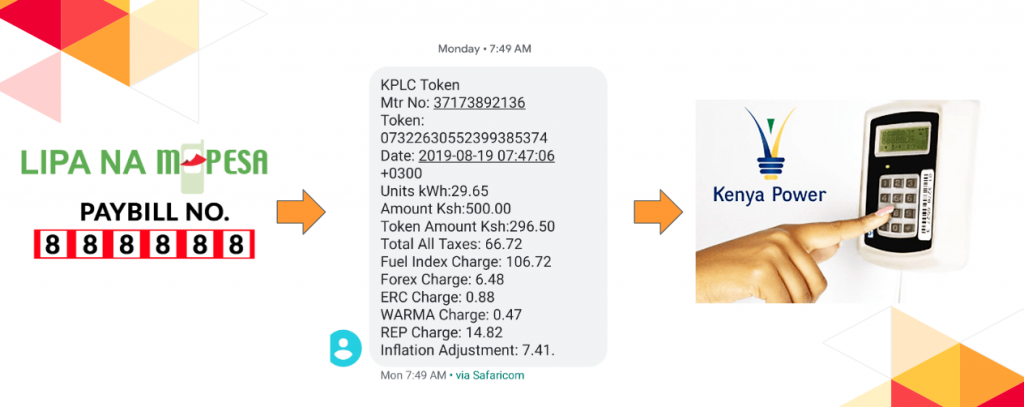
You are now ready to begin using prepayment. Customers can now procure STS prepaid tokens (20 digit numbers) using your payment gateway for any desired quantity of water, electricity or gas and enter them into the meters. The image below shows the workflow for current users obtaining tokens from a the power generation utility in Kenya and making payment via MPESA
In the next series of this blog, we shall explain the technical aspects of generating an STS compliant prepaid token; mainly the process of generating Decoder Keys and using these in the various Encryption Algorithms supported by the STS standard to generate tokens.
Stay tuned!
]]>